
When Christmas finally rolls around, you’re going to be going all out while decorating your house, that’s just the way it is.
And a lot of that stuff costs quite a bit of money. Every single year we all spend tons of money during the holiday season and you could argue that it’s worth it, but it’s still a blow to your wallet.
If you’ve got an interest in woodwork though, which you probably do if you’re reading this, you can kill two birds with one stone this year.
You can cut down a little on your costs by taking the DIY route with some of your Christmas decorations, while also getting to scratch that woodworking itch.
With the goal to be festive and eye-catching, you can get very creative and have a lot of fun doing DIY projects that center around Christmas.
Here are 3 relatively simple ones that you build this year.
Reclaimed Wood Christmas Tree

Source: https://www.funkyjunkinteriors.net/2015/12/reclaimed-wood-christmas-tree-and-star-front-porch.html
By no means would I consider this a replacement for an actual Christmas tree in your living room, but sometimes it’s nice to decorate outside too.
Anyone passing by your house will definitely stop and take notice of something like this if you have it set up on your front porch
It’s made from reclaimed wood too so it’s not going to cost you a whole lot and the tools and equipment are pretty minimal too.
Once you’ve got all the wood you need, there’s really only a couple of different parts that you have to work on to complete the design.
You first need to make a stand as well as a tall post that will fit into the stand and stretch to the top of the tree.
Then you’ll work on each of the individual boards that will make up the front of the tree. Each one you will cut to length with a circular saw and they’ll get progressively smaller.
You’ll need a good drill as well as some metal hinges and screws and once it’s done you can decorate it as you please.
Funkyjunkinteriors.net has the full tutorial.
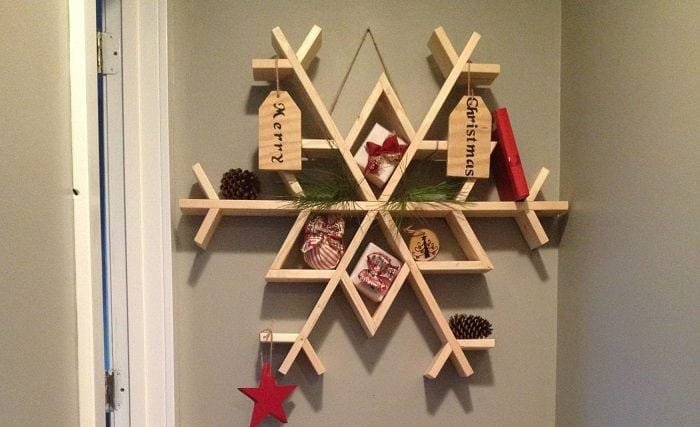
Wooden Snowflake Shelf
Source: https://www.woodshopdiaries.com/let-it-snow-my-diy-wooden-snowflake-shelf/
This project is very enjoyable and it’s also something that’s going to be extremely useful for the holiday season.
Not only does it look really cool and festive, but it’s also some extra shelf space for you this Christmas and we all know how important that is.
You could use it to display your Christmas cards on, you could hang Christmas stockings on it and you could even put some smaller gifts on there.
It’s in a lot of different parts and it takes a little bit of time to put together, but for the most part, it’s actually pretty straightforward.
There is an awful lot of wood needed for this. You will need about 18 feet of 1×4 lumber and several nails of no longer than 1 ½ inches.
You will also need a nail gun, some glue and a miter saw. The miter saw is a little bit different from the circular saw in the previous tutorial.
Anyway, there’s a lot of different angles on this one as you can see and you need to be very precise with each cut.
It can also be tricky getting the nail gun and the glue into each of these but with a bit of practice, you should get the hang of it.
Check out the full tutorial on woodshopdiaries.com.
Tree Wall Shelf
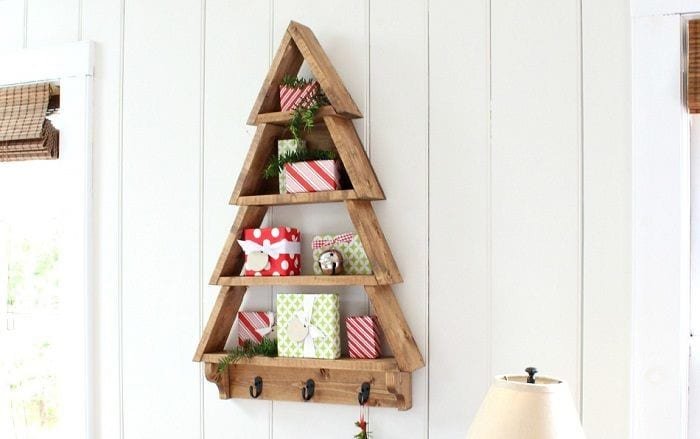
On the subject of shelves, and of trees actually, you can never have too much of those during Christmas.
So if that snowflake shelf doesn’t pique your interest, then how does a Christmas tree shelf sound?
This is a little bit more difficult than the previous projects and it will take a bit more time and requirement more tools, but it also offers a lot more space.
Again, this one is made out of 1×4 boards and it’s got quite a few awkward angled cuts. You’ll also need some plywood for the base.
In terms of the tools, all of the basic stuff like the drill, the tape measure and the sander are there but you’ll also need a couple of different saws.
It’s good to actually have a stock of different saws because they don’t all work for each specific project.
Miter saws and circular saws are pretty standard among woodworkers but you should also at least get a jigsaw too. Here are some of the better ones.
The miter and the jigsaw will come in handy in this project. What this entails is cutting each of the boards to length so that you can glue them together in triangular shapes.
Similar to the tree that we talked about earlier in appearance but of course, much more practical and useful.
Ana’s got you covered for the full tutorial over at ana-white.com.
Conclusion
Some people might think that putting in these construction projects is just adding to the stress of Christmas, but I prefer to think of these as relaxing.
Plus, you’re guests will be blown away by your creativity. Give your house a personal feel with these festive, homemade decorations.